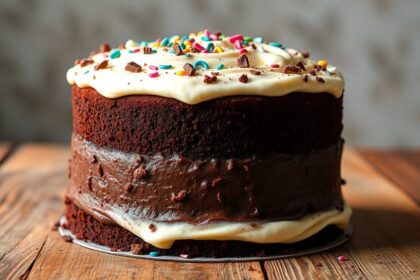
Every home baker should master a variety of essential desserts to impress friends and family. Start with classic chocolate chip cookies for a timeless treat. Learn to bake a moist vanilla cake that’s perfect for celebrations. Explore decadent brownies in fudgy or cake-like styles. Perfect your cheesecake and homemade apple pie. Don’t forget treats like s’mores and chocolate lava cake. There’s more to discover, so keep exploring to find even more delightful recipes!
Classic Chocolate Chip Cookies: The Ultimate Recipe

When you think of classic desserts, chocolate chip cookies often come to mind as a timeless favorite. You can easily elevate this beloved treat by experimenting with chocolate variations. Try using dark chocolate, milk chocolate, or even white chocolate chips to create a unique flavor profile. The key to achieving the perfect cookie texture lies in balancing the ingredients. For a chewy cookie, use more brown sugar and slightly underbake them; for a crispier version, opt for more granulated sugar and bake a bit longer. Using browned butter in the recipe can enhance the nutty flavor, making your cookies even more delicious. Additionally, chilling the dough for at least 30 minutes before baking can help achieve soft, chewy cookies, enhancing their texture. To prevent excessive spreading, consider refrigerating dough for at least an hour before baking. Don’t forget to let the cookies cool on the baking sheet for a few minutes before transferring them to a wire rack. This way, you’ll enjoy cookies that are both delicious and perfectly textured every time.
Moist and Fluffy Vanilla Cake to Impress
When you want to bake a moist and fluffy vanilla cake, choosing the right ingredients is essential. You’ll also need a few baking tips to guarantee it turns out perfectly every time. Let’s explore what makes this cake a showstopper! For optimal results, bake your cake at 350°F (175°C) to achieve the perfect texture. Incorporating room temperature ingredients like eggs and butter can contribute significantly to a consistent and airy batter. Additionally, using high-quality vanilla extract enhances the flavor profile, making your cake truly memorable.
Key Ingredients for Success
Here are some essentials you’ll need:
- Quality vanilla extract: It enhances flavor and aroma.
- Butter types: Use unsalted for better control of salt levels.
- Flour types: All-purpose flour works best for structure and moisture.
- Leavening agents: Baking powder or baking soda is imperative for that airy lift, as baking techniques can significantly affect the final result. Additionally, layering techniques can create distinct textures, similar to those found in more complex desserts like opera cake.
Freshness matters, so always check your pantry staples. Additionally, incorporating accurate flour measurement can prevent dryness and ensure a delightful crumb.
Measuring accuracy is important, too. If you’re in a pinch, be mindful of ingredient substitutions, especially with egg sizes and sugar varieties.
Baking Tips for Perfection
To achieve a moist and fluffy vanilla cake that leaves a lasting impression, you need to pay attention to a few key baking tips.
First, always preheat your oven to the right temperature; it’s essential for even baking. When considering ingredient substitutions, verify they won’t compromise the cake’s texture.
Use proper mixing techniques, like creaming butter and sugar thoroughly, to incorporate air. Invest in quality baking tools for consistent results.
If scaling a recipe, adjust ingredients proportionately for balance. Keep flavor balancing in mind by adding vanilla extract or almond for depth.
Explore texture variations by experimenting with buttermilk or yogurt. Additionally, consider the classic Italian cassata cake ingredients for a rich twist on traditional flavors.
Finally, presentation tips like dusting with powdered sugar or fresh fruit can elevate your cake’s visual appeal.
Decadent Brownies: Fudgy vs. Cake-Like
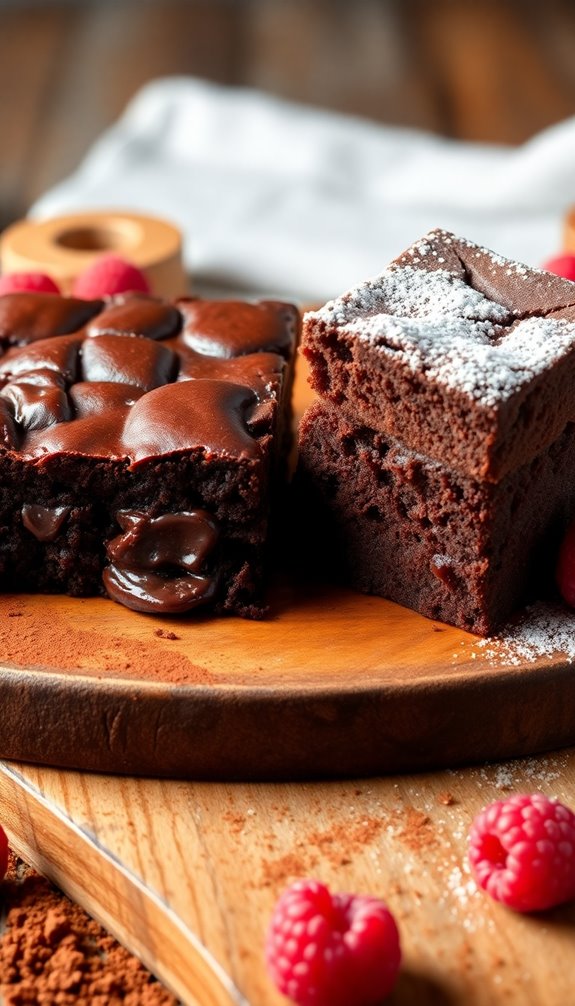
When it comes to brownies, you’ve got two delicious options: fudgy and cake-like.
Fudgy brownies are rich and gooey, while cake-like brownies offer a lighter texture.
Let’s explore what makes each type unique and help you choose your favorite!
Fudgy Brownies Characteristics
Fudgy brownies are the ultimate treat for chocolate lovers, boasting a rich, dense texture that melts in your mouth. Their unique characteristics set them apart, making them a must-try for any home baker.
- Fudgy texture: Achieved with the right ingredient ratios, creating that melt-in-your-mouth experience.
- Chewy consistency: Perfectly balanced to give you that satisfying bite.
- Gooey center: The heart of fudgy brownies, filled with intense chocolate flavor.
- Crusty top: A delightful contrast to the soft interior, enhancing the overall experience.
To master these brownies, focus on precise baking time and effective cooling methods.
You’ll be rewarded with a rich flavor and chocolate intensity that keeps everyone coming back for more!
Cake-Like Brownies Features
While fudgy brownies offer an indulgent, rich experience, cake-like brownies present a lighter, airy alternative that appeals to those who prefer a different texture.
These brownies boast a cake texture, which results from a higher flour content and the incorporation of baking powder. This combination allows them to rise and create that signature fluffy bite.
To achieve the perfect cake-like brownie, pay attention to your baking temperature. A cooler oven, usually around 350°F, helps them set without becoming too dry.
When baked correctly, cake-like brownies deliver a delightful balance between sweetness and lightness, making them perfect for those who enjoy a less dense dessert.
Mastering this style will elevate your brownie repertoire!
Choosing Your Preference
How do you decide between fudgy and cake-like brownies? It all boils down to your personal preferences and the flavors you enjoy.
Fudgy brownies are rich, dense, and intensely chocolatey, perfect for those who crave a gooey treat. On the other hand, cake-like brownies are lighter, with a fluffy texture that resembles cake, great if you prefer a less indulgent option.
Here are some factors to take into account when choosing flavors:
- Texture: Do you want something chewy or airy?
- Chocolate Intensity: Are you a fan of deep, dark chocolate or milder sweetness?
- Serving Occasion: Will these brownies be a casual snack or a special dessert?
- Add-ins: Are you looking to include nuts, caramel, or other mix-ins?
Make your choice and enjoy!
Perfecting the Art of Cheesecake: Tips and Tricks
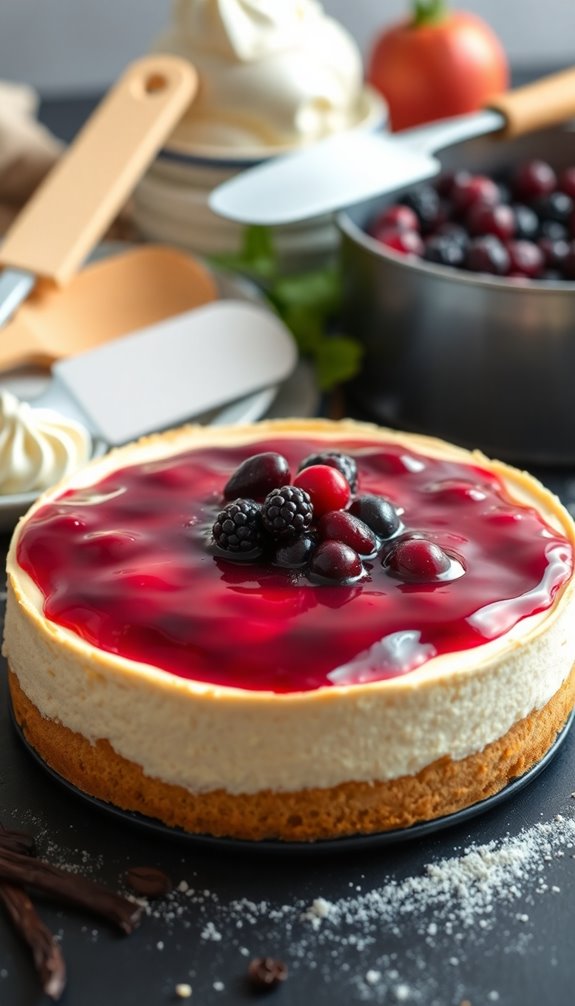
To achieve a truly exceptional cheesecake, it’s essential to master a few key techniques that can elevate your baking game.
Start with the cheesecake crust; a buttery graham cracker base adds flavor and texture. Make sure you press it firmly into the pan and pre-bake it for a few minutes to avoid a soggy bottom.
A buttery graham cracker crust is key; press it firmly and pre-bake to achieve that perfect texture.
When mixing your filling, avoid overbeating to prevent cracks. Incorporate room-temperature ingredients for a smooth consistency.
Finally, consider your cheesecake toppings; fresh fruit, chocolate ganache, or a drizzle of caramel can enhance the final presentation and flavor.
After baking, let your cheesecake cool slowly in the oven, which helps minimize cracks. With these tips, you’ll create a cheesecake that impresses every time.
Homemade Apple Pie: A Timeless Favorite
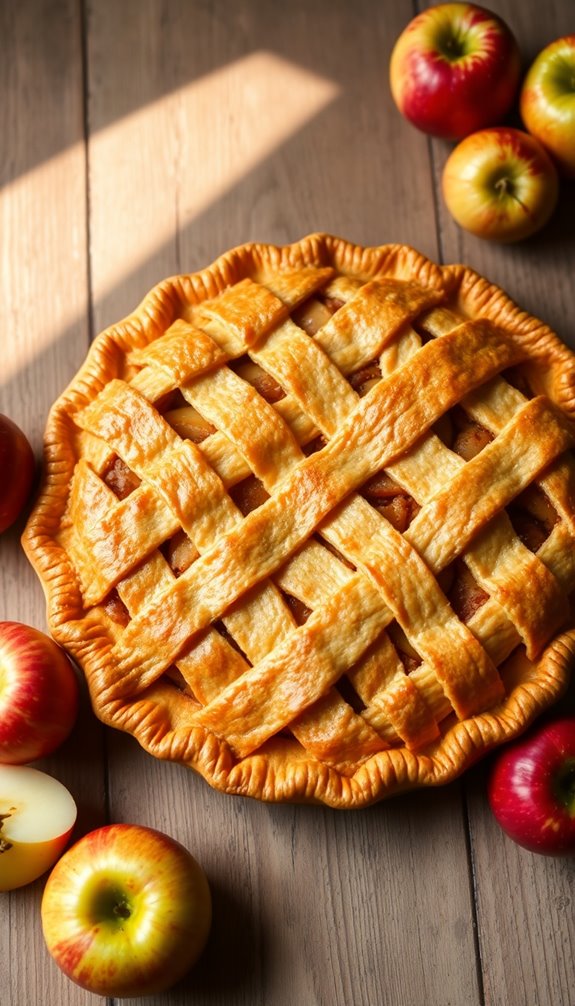
After mastering the art of cheesecake, you might find yourself ready to tackle another classic: homemade apple pie. This dessert isn’t just comforting; it’s a celebration of flavors and textures.
By choosing the right apple varieties, you can elevate your pie to new heights. Consider mixing tart and sweet apples for a balanced taste.
Here are a few tips to guide you:
- Use a flaky, buttery pie crust for the best texture.
- Pre-cook your apples slightly to enhance flavor and prevent a soggy bottom.
- Add spices like cinnamon and nutmeg to deepen the taste.
- Serve warm with a scoop of vanilla ice cream for the ultimate treat.
With these elements in play, your homemade apple pie will surely impress!
Light and Airy Pavlova: Mastering Meringue
While mastering meringue can seem intimidating, creating a light and airy pavlova is incredibly rewarding.
To begin, make certain your mixing bowl and beaters are spotless—any grease can hinder your meringue’s rise. Use basic meringue techniques, like beating egg whites until soft peaks form, then gradually adding sugar until you achieve glossy stiff peaks.
Once baked, let your pavlova cool completely to maintain its delicate texture.
Now, for the fun part: choosing your pavlova toppings! Fresh berries, whipped cream, or a drizzle of passion fruit syrup elevate your dessert.
Feel free to experiment with flavors and textures, but remember: the key lies in that perfect meringue base. With practice, you’ll impress everyone with your elegant pavlova!
Rich Chocolate Mousse for Every Occasion
When it comes to creating a rich chocolate mousse, mastering the chocolate base is key to attaining that deep, indulgent flavor.
You’ll also want to focus on your whipping techniques to guarantee your mousse is light and airy.
Let’s explore the steps that will make your mousse the star of any occasion.
Perfecting The Chocolate Base
Creating a rich chocolate mousse that’s perfect for any occasion starts with a solid chocolate base.
You’ll want to master some essential chocolate tempering techniques to guarantee your chocolate melts smoothly and maintains its shine. Understanding various chocolate flavor profiles is vital too; try different types of chocolate to discover what you love most.
- Choose high-quality chocolate for the best taste.
- Use a double boiler for gentle melting.
- Stir continuously to avoid burning.
- Allow the chocolate to cool slightly before adding other ingredients.
With these tips, you’ll create a velvety chocolate base that elevates your mousse to new heights.
Trust in the process, and enjoy the delicious results!
Whipping Techniques For Airiness
Mastering the art of whipping is essential for achieving the light, airy texture of a rich chocolate mousse. Start with cold whipping cream or egg whites, as cold ingredients whip better.
Use proper incorporation techniques, like gently folding in whipped topping, to maintain aeration importance. For meringue stability, guarantee your egg whites are whipped to stiff peaks without over whipping, which can lead to a grainy texture.
Employ effective folding methods to enhance texture without deflating your mixture. Remember, the right aeration contributes to flavor infusion, making your mousse unforgettable.
Be cautious of over whipping risks; it’s better to stop a bit earlier than to lose that precious lightness. With practice, your chocolate mousse will impress every time!
Traditional Tiramisu: A Coffee Lover’s Dream
If you’re a coffee lover, traditional tiramisu is a dessert you simply can’t resist. This classic Italian treat layers rich coffee-soaked ladyfingers with a creamy mascarpone filling, creating a perfect harmony of flavors.
To elevate your tiramisu game, consider these delicious options:
- Experiment with tiramisu variations like fruit or chocolate-infused layers.
- Pair it with a robust espresso for an intensified coffee experience.
- Serve it alongside a scoop of vanilla gelato for a delightful contrast.
- Top it with cocoa powder or chocolate shavings for added texture.
With its luxurious taste and versatile coffee pairings, mastering traditional tiramisu is a must for any home baker.
It’s the ultimate indulgence that’ll impress your family and friends alike!
Simple Yet Elegant Fruit Tart Recipe
A simple yet elegant fruit tart is the perfect way to showcase fresh seasonal fruits while impressing your guests.
To create this stunning dessert, start with a buttery tart crust, blind-baking it until golden.
Begin your culinary journey with a buttery tart crust, expertly blind-baked to a perfect golden hue.
Next, prepare a creamy pastry cream flavored with vanilla, spreading it evenly in the cooled crust.
Now comes the fun part: artfully arrange your choice of seasonal fruit—think strawberries, blueberries, and kiwi—for a vibrant and colorful topping.
For an elegant presentation, glaze the fruit with a warm apricot jam to give it a beautiful shine.
Chill the tart for a bit before serving, allowing the flavors to meld.
Your guests will be captivated by the delightful combination of flavors and the tart’s stunning appearance!
No-Bake Desserts: Quick and Easy Options
When you’re short on time but still want to impress with a delicious dessert, no-bake options are your best friends.
These easy dessert ideas require minimal effort and can satisfy your sweet tooth without turning on the oven.
Let’s explore some delightful no-bake treats you can whip up in no time:
- Chocolate Mousse: Rich and creamy, this treat is a classic favorite.
- Cheesecake Cups: Layered with graham cracker crumbs, they’re perfect for portion control.
- Fruit Parfaits: Combine yogurt and your favorite fruits for a revitalizing option.
- Energy Bites: Made with oats and nut butter, they’re a healthy snack with a sweet twist.
With these no-bake desserts, you’ll impress everyone while saving time!
Warm Bread Pudding With Vanilla Sauce
After enjoying the ease of no-bake desserts, you might crave something warm and comforting. That’s where warm bread pudding comes in, a classic treat that’s both simple and satisfying.
To make it, start by cubing stale bread and soaking it in a mixture of milk, eggs, sugar, and your favorite spices. Bake until golden brown, and let those delicious aromas fill your kitchen.
Start by cubing stale bread, soaking it in a rich mixture, and bake until golden to fill your kitchen with delightful aromas.
For the perfect finishing touch, whip up a luscious vanilla sauce by combining butter, sugar, cream, and vanilla extract over low heat until smooth. Drizzle the warm sauce over your bread pudding, and enjoy each comforting bite.
This dessert is sure to warm your heart and become a favorite in your home baking repertoire.
Classic Lemon Bars: Tangy and Sweet Bliss
If you’re craving a dessert that perfectly balances tartness and sweetness, classic lemon bars are the answer. These delightful treats feature a buttery crust topped with a zesty lemon filling, making them irresistible.
To master this recipe, focus on these key baking techniques:
- Use fresh lemon juice and zest for maximum flavor.
- Confirm your crust is evenly baked for a perfect base.
- Whisk the filling until smooth to avoid lumps.
- Dust with powdered sugar for a beautiful finish.
With a little practice, you’ll create lemon bars that impress everyone. Their bright, tangy taste is sure to brighten any occasion, making them a must-have in your dessert repertoire.
Enjoy the bliss of these lemony delights!
Indulgent Red Velvet Cake: A Showstopper
Indulgence is the name of the game with a classic red velvet cake, a dessert that captivates with its vibrant color and rich flavor.
Experience the indulgence of classic red velvet cake, a dessert that mesmerizes with its dazzling hue and deep, rich flavor.
This cake has a fascinating red velvet history, originating in the 1800s, and has evolved into a beloved favorite for celebrations.
Its unique flavor profile combines hints of cocoa with buttermilk’s tang, complemented by a creamy cream cheese frosting that enhances every bite.
When you master this showstopper, you’ll impress everyone with its striking appearance and delicious taste.
Don’t shy away from experimenting with your own twist, whether that’s adding a hint of vanilla or a splash of espresso.
Your red velvet cake will surely steal the spotlight at any gathering!
Chocolate Chip Banana Bread: A Perfect Snack
If you want to whip up a delicious chocolate chip banana bread, start with ripe bananas for the best flavor.
You’ll also need to perfect the chocolate ratio to balance sweetness and richness.
With a few baking tips, you’ll achieve a moist, satisfying snack that everyone will love.
Ripe Bananas Are Key
Ripe bananas are the secret ingredient that transforms ordinary chocolate chip banana bread into a delightful treat. Their natural sweetness and moisture elevate your baking game, making each slice irresistible.
When you use overripe bananas, you’re not just enhancing flavor; you’re ensuring a tender, moist texture that rivals even the best banana pudding.
Here’s why ripe bananas are essential:
- Enhanced Flavor: They bring out the deep, sweet taste you crave.
- Moisture: They add moisture, resulting in a soft, tender crumb.
- Natural Sweetener: You can reduce added sugar without sacrificing sweetness.
- Easy to Mash: Ripe bananas mash easily, simplifying your prep time.
Perfecting The Chocolate Ratio
Finding the perfect chocolate ratio for your chocolate chip banana bread can make all the difference between a good snack and an extraordinary one. Aim for about one cup of semi-sweet chocolate chips for every three ripe bananas. This ratio guarantees that the chocolate pairings enhance the banana flavor without overwhelming it.
If you prefer a richer taste, try incorporating dark chocolate chips; their bitterness can add depth while balancing sweetness. Don’t shy away from experimenting—mix in white chocolate or even peanut butter chips for a delightful twist.
Baking Tips For Success
While baking chocolate chip banana bread may seem straightforward, a few key tips can elevate your results from good to outstanding. Pay attention to these essential strategies:
- Baking temperature adjustments: Make certain your oven is preheated to the right temperature for even baking.
- Measuring techniques: Use a kitchen scale for precision, especially with flour and sugar.
- Oven placement: Position your loaf in the center of the oven for ideal airflow and even cooking.
- Cooling methods: Allow your banana bread to cool in the pan for 10 minutes before transferring it to a wire rack to enhance texture.
Consider ingredient substitutions for healthier options, and experiment with flavor enhancements like nuts or spices.
Timing strategies can also help achieve the perfect bake!
Funfetti Cupcakes for Celebrations
When you want to add a touch of joy to any celebration, Funfetti cupcakes are a surefire way to do it. These delightful treats aren’t only easy to make, but they’re also a crowd-pleaser.
Start with a simple vanilla batter and fold in a generous amount of celebration sprinkles. This adds color and excitement to each bite!
Once baked and cooled, it’s time to get creative with your frosting. Use a classic buttercream or cream cheese frosting, and don’t forget to pile on more festive toppings like extra sprinkles, edible glitter, or colorful candies.
Whether it’s a birthday, graduation, or just because, these Funfetti cupcakes will bring smiles and sweetness to every occasion.
Easy Rice Pudding: A Comforting Dessert
Rice pudding is a timeless dessert that combines simple ingredients for a truly comforting treat.
You’ll love how easy it’s to whip up this classic dish, and there are plenty of ways to customize its flavor.
Let’s explore the essential ingredients, the straightforward cooking method, and some fun variations you can try!
Classic Ingredients Overview
At the heart of a comforting rice pudding lies a handful of classic ingredients that come together to create a warm and inviting dessert.
While rice is the star, you’ll want to take into account the following components to elevate your dish:
- Milk or cream: For that rich, creamy texture.
- Sugar varieties: Granulated, brown, or even honey can sweeten your pudding perfectly.
- Cinnamon or vanilla: These add warm, aromatic flavors that enhance the overall taste.
- Butter: A touch of butter brings richness and depth to the pudding.
While flour types aren’t typically used in rice pudding, knowing how to balance these ingredients can help you perfect this timeless dessert.
Enjoy the process and savor each bite!
Simple Cooking Method
To create a comforting bowl of rice pudding, you’ll find that the cooking method is both straightforward and rewarding.
Start by rinsing your rice to remove excess starch, then combine it with milk, sugar, and a pinch of salt in a saucepan.
Use simple techniques to simmer the mixture over low heat, stirring frequently to prevent sticking. As the rice absorbs the liquid, you’ll see it transform into a creamy dessert.
Once it reaches your desired consistency, remove it from the heat and let it cool slightly.
This easy dessert is perfect for any occasion and can be made in under an hour. You’ll love how these simple techniques turn basic ingredients into a comforting delight!
Flavor Variations Ideas
While creating a classic rice pudding is a delight in itself, experimenting with flavor variations can elevate this comforting dessert to new heights.
You can easily customize your pudding to suit your taste or the season. Here are some ideas to inspire you:
- Citrus twists: Add lemon or orange zest for a revitalizing kick.
- Spice variations: Try cinnamon, nutmeg, or cardamom for warmth.
- Nut additions: Incorporate toasted almonds or walnuts for crunch.
- Chocolate enhancements: Stir in cocoa powder or chocolate chips for decadence.
Don’t forget to explore fruit flavors or seasonal fruits, and consider herb infusions or salted caramel for a unique twist.
With coffee blends or extract substitutions, your rice pudding will never be the same!
Classic Panna Cotta: Creamy and Delicious
If you’re looking for a dessert that’s both elegant and simple to make, classic panna cotta is the perfect choice. This creamy Italian treat requires just a few ingredients: cream, sugar, gelatin, and vanilla.
The beauty of panna cotta lies in its versatility. You can easily experiment with panna cotta variations by adding different flavor infusions like coffee, chocolate, or fruit purées.
To start, heat the cream and sugar, dissolve the gelatin, and pour the mixture into molds. After chilling, you’ll have a luscious dessert ready to impress.
Serve it with a berry compote or a drizzle of caramel for added flair. Mastering panna cotta will elevate your dessert game and delight your guests!
Homemade Ice Cream: Endless Flavor Possibilities
Making homemade ice cream opens up a world of flavor possibilities that you can truly call your own.
With a classic ice cream base, you can experiment with unique combinations that surprise your taste buds.
Get ready to release your creativity and whip up something delicious!
Classic Ice Cream Bases
Creating classic ice cream bases at home opens up a world of flavor possibilities that store-bought varieties simply can’t match.
By mastering these techniques, you’ll have the foundation to create your favorite ice cream flavors. Here are some key elements to reflect on:
- Custard Base: Rich and creamy, perfect for vanilla or chocolate.
- Philadelphia Style: No eggs, quicker to make, great for fruity flavors.
- Gelato Base: Less air and fat, ideal for a dense, flavorful treat.
- Vegan Base: Use coconut or almond milk for dairy-free options.
With these bases, you’ll transform simple ingredients into delicious homemade ice cream.
Experimenting with different ice cream techniques will reveal a universe of delightful tastes.
Happy churning!
Unique Flavor Combinations
While traditional flavors like vanilla and chocolate hold a special place in our hearts, experimenting with unique flavor combinations can elevate your homemade ice cream to a whole new level.
Try a spicy chocolate blend for a kick, or invigorate your palate with lavender lemon. For a nutty twist, cardamom pistachio is a delight, while matcha white offers a unique green tea experience.
If you love fruit, basil strawberry and ginger peach create revitalizing contrasts. Don’t overlook rosemary chocolate or chili orange for unexpected depth.
Coconut lime provides a tropical escape, and honey lavender adds a floral sweetness.
With these combinations, you’ll impress everyone with your adventurous ice cream creations!
Decadent Sticky Toffee Pudding Recipe
If you’re looking to indulge in a warm, comforting dessert, a decadent sticky toffee pudding might just be your perfect choice. This classic British dessert features rich date flavors and a luscious sticky toffee sauce that’s hard to resist.
Here are some ideas to elevate your pudding experience:
- Experiment with sauce variations like salted caramel or chocolate sauce.
- Serve with a scoop of vanilla ice cream for an extra creamy touch.
- Add chopped nuts for a delightful crunch.
- Pair it with a drizzle of heavy cream for indulgent richness.
Mastering this sticky toffee pudding will surely impress your friends and family, making it a standout dessert at any gathering.
Get ready to enjoy every gooey bite!
Layered Dessert: Trifle for Any Occasion
Trifles are a fantastic way to impress your guests, and they’re surprisingly easy to make.
You’ll want to understand the classic ingredients and mastering the layering techniques to create a stunning dessert.
Plus, with a few seasonal twists, you can adapt trifles for any occasion!
Classic Trifle Ingredients Explained
Creating a classic trifle is all about layering delicious ingredients that come together to form a stunning dessert.
The beauty of a trifle lies in its versatility, allowing for countless trifle variations. Here’s what you’ll typically need for those delightful trifle layers:
- Cake: Sponge cake or ladyfingers work beautifully as the base.
- Custard: A rich, creamy custard adds a luscious texture.
- Fruit: Fresh berries or poached fruits bring sweetness and color.
- Whipped Cream: Light and airy, it crowns your trifle and balances flavors.
With these essential components, you can create a show-stopping trifle that’s perfect for any occasion.
Don’t hesitate to mix and match ingredients for your own unique twist!
Layering Techniques for Trifles
Mastering layering techniques can elevate your trifle from simple to sensational. Start by choosing a clear glass dish to showcase your masterpiece.
Begin with a layer of sponge cake soaked in syrup or liqueur, followed by a rich custard. Next, add a layer of fresh fruit to brighten the flavors.
Repeat these trifle assembly techniques, ensuring you alternate between textures and flavors. As you layer, think about layering flavor profiles—sweet, tart, creamy, and crunchy—to create a balanced dessert.
Don’t rush; take your time to build each layer thoughtfully. Finish with a dollop of whipped cream and a sprinkle of nuts or chocolate shavings for that extra touch.
Your guests will be impressed by both the taste and presentation!
Variations for Seasonal Trifles
When it comes to seasonal trifles, you can transform this classic dessert into a celebration of flavors and colors that reflect the time of year.
Experiment with layer variations and ingredient swaps to create unique combinations. Here are some ideas to inspire your festive themes:
- Use seasonal fruit like berries in summer or apples in fall for fresh flavors.
- Incorporate flavor infusions, such as peppermint in winter or citrus zest in spring.
- Play with color combinations and texture contrasts, mixing creamy layers with crunchy toppings.
- Add seasonal spices, like cinnamon or nutmeg, to enhance your holiday inspirations.
With these tips, you’ll be crafting stunning trifles that not only taste amazing but also brighten any occasion!
Sweet and Savory Galette: An Unexpected Treat
Have you ever considered how a simple galette can elevate your baking game? This rustic dessert isn’t just for sweet treats; it’s perfect for savory fillings too!
Picture a flaky crust filled with roasted vegetables or rich cheese, offering a delightful contrast to the sweetness of fruit toppings like ripe berries or peaches. Plus, if you or your guests need gluten-free options, you can easily adapt the crust recipe to accommodate that.
Imagine a buttery crust brimming with savory delights, perfectly balancing the sweetness of fresh fruit toppings. Gluten-free options are easily achievable!
The beauty of a galette lies in its rustic presentation—no need for perfect shapes. Just roll out the dough, fill it, and fold the edges.
Whether you serve it warm or at room temperature, a galette is sure to impress everyone at your next gathering.
Simple Chocolate Fondue for Sharing
After enjoying a rustic galette, it’s time to indulge in something a bit more interactive: chocolate fondue. This delightful treat invites everyone to gather around and dip their favorite goodies into gooey melted chocolate.
For a stunning fondue presentation, choose a variety of fruit dippers that add color and flavor to your spread.
Here’s what you’ll need:
- Fresh strawberries
- Banana slices
- Marshmallows
- Pretzel bites
Simply melt chocolate in a fondue pot, then arrange your dippers around it.
Encourage your guests to get creative with their combinations! The joy of sharing and experimenting with flavors makes chocolate fondue a perfect dessert for gatherings and celebrations. Enjoy every dip!
Coconut Macaroons: Chewy and Delicious
Whether you’re a coconut lover or just looking for a delightful treat, coconut macaroons are sure to satisfy your sweet tooth.
These chewy delights have a rich history, dating back to Italy in the 19th century, where they were made with almond paste. Today, you can easily find coconut variations, like chocolate-dipped or drizzled with caramel, to elevate your baking game.
To make them, you’ll need just a few simple ingredients: shredded coconut, egg whites, and sugar.
The beauty of macaroons lies in their versatility; you can customize them with different flavors or add-ins, such as nuts or extracts.
Perfect for any occasion, mastering coconut macaroons will impress your family and friends with your baking prowess!
Classic Gingerbread Cookies: Holiday Cheer
Coconut macaroons may have satisfied your sweet cravings, but nothing quite captures the spirit of the holiday season like classic gingerbread cookies.
These delightful treats aren’t just about taste; they’re a canvas for your creativity with gingerbread decorating. The warm, inviting aroma of festive spices fills your kitchen as you bake, making it a cherished holiday tradition.
To master these cookies, keep in mind:
- Use molasses for rich flavor
- Incorporate ginger, cinnamon, and nutmeg for those festive spices
- Roll out the dough for uniform thickness
- Get creative with icing and decorations
When you bite into a gingerbread cookie, you’ll feel the joy of the season in every delicious morsel.
Enjoy baking and decorating!
Easy Snickerdoodles: Cinnamon Sugar Goodness
If you want to bake the perfect snickerdoodles, you’ll need to gather some classic ingredients that create that irresistible flavor.
Mastering the rolling technique is essential for achieving those signature cinnamon sugar-coated cookies.
Plus, a few baking tips can help guarantee your snickerdoodles turn out soft and chewy every time.
Classic Snickerdoodle Ingredients
To make classic snickerdoodles, you’ll need just a handful of essential ingredients that come together to create their signature flavor.
These delightful cookies have a rich snickerdoodle history, believed to have originated in the 19th century. While there are many fun snickerdoodle variations out there, sticking to the basics will give you that perfect chewy texture and cinnamon-sugar goodness.
- All-purpose flour
- Granulated sugar
- Unsalted butter
- Eggs
With these key ingredients, you’ll capture the essence of traditional snickerdoodles.
Once you’ve mastered the basics, feel free to explore different variations, like adding chocolate chips or nuts, to keep your baking exciting!
Perfecting The Rolling Technique
While mastering the art of rolling your snickerdoodle dough may seem simple, perfecting this technique is essential for achieving that delightful cinnamon-sugar coating.
Start by dividing your dough into equal portions, about one tablespoon each. Roll each piece into a smooth ball between your palms, ensuring they’re uniform for even baking. Pay attention to the dough thickness; if your balls are too flat, they won’t hold the sugar well.
Next, gently roll each ball in a mixture of cinnamon and sugar, making sure they’re completely coated. Experiment with different rolling techniques, like rolling in your palms or on a floured surface, to find what works best for you.
Master this, and your snickerdoodles will shine with that signature sweetness!
Baking Tips For Success
Perfecting your rolling technique sets the stage for your snickerdoodles, but there are more tips that can elevate your baking game.
Here are some essential strategies to guarantee success:
- Oven preheating importance: Always preheat your oven for even baking.
- Proper measuring techniques: Use the right tools to avoid common baking mistakes.
- Ingredient substitution tips: Know how to swap ingredients without compromising flavor.
- Cooling methods explained: Let your cookies cool properly to achieve the perfect texture.
Pecan Pie: A Southern Tradition
Pecan pie stands as a beloved symbol of Southern hospitality and tradition. To master this classic dessert, start by choosing the right pecan varieties; each offers unique flavors and textures.
A flaky pie crust is essential, providing the perfect base for the rich, sweet filling. You’ll want to experiment with different sweet fillings until you find your favorite mix of sweetness and nuttiness.
During holiday gatherings, serve your pecan pie warm with a scoop of vanilla ice cream or whipped cream for a delightful contrast. Consider adding nut toppings for an extra crunch.
Perfecting the texture takes practice, but the result is a luscious pie that embodies the warmth and charm of Southern traditions, making it a cherished staple at any celebration.
Homemade S’mores: Campfire Fun Indoors
If you’re craving a taste of summer nostalgia, homemade s’mores bring the joy of campfire fun right into your kitchen. You don’t need a campfire to enjoy this classic treat; just gather your ingredients and get creative with s’mores variations.
Here’s what you’ll need for your indoor camping experience:
- Graham crackers
- Marshmallows
- Chocolate bars (or your favorite chocolate spread)
- Optional toppings (peanut butter, fruit, or caramel)
Toast your marshmallows over a flame or in the microwave, then layer them between the graham crackers and chocolate.
You can even experiment with different chocolates or toppings to make each batch unique. With these simple steps, you’ll have a delightful taste of summer all year round!
Delicious Chocolate Lava Cake: A Surprise Inside
As you plunge into the world of baking, nothing quite compares to the excitement of creating a chocolate lava cake, where a rich, molten center awaits to surprise and delight your taste buds.
This dessert combines a delicate outer layer with a gooey chocolate core that oozes out when you cut into it. To master this treat, you’ll need high-quality chocolate, butter, eggs, sugar, and a touch of flour.
The secret lies in baking it just the right amount—too long, and you’ll miss that luscious molten center. Serve it warm with a scoop of vanilla ice cream, and watch as your friends and family savor each decadent bite.
Trust us, this lava cake will become a favorite in your baking repertoire!
Classic Crème Brûlée: How to Get That Perfect Crust?
While mastering the art of crème brûlée might seem intimidating, achieving that perfect caramelized crust is simpler than you think.
By using the right caramel techniques and following some safety tips, you can impress your guests with a delightful dessert. Here’s how to create that stunning crust:
- Choose the right sugar: Use superfine sugar for even melting.
- Even distribution: Sprinkle a thin, even layer of sugar over the custard.
- Use a kitchen torch: Confirm you maintain torch safety by keeping it upright and away from flammable materials.
- Watch for color: Caramelize until you see a deep golden hue, then let it cool for a few minutes.
With these steps, you’ll master the perfect crème brûlée crust every time!
Eclairs: Mastering Choux Pastry
Mastering choux pastry is the key to creating light, airy éclairs that are sure to impress.
Start by using proper choux pastry techniques: combine water, butter, and a pinch of salt in a saucepan, then add flour and stir until a smooth dough forms. Cook the dough briefly to remove moisture, then let it cool slightly before adding eggs one at a time until you achieve a glossy consistency.
Master the art of choux pastry by combining water, butter, and flour for a smooth, glossy dough perfect for éclairs.
Pipe the dough into even lines on a baking sheet and bake until puffed and golden.
Once cooled, fill your éclairs with a delicious eclair filling, like pastry cream or whipped cream, and top them with chocolate ganache for an irresistible treat.
Enjoy your homemade éclairs!
Conclusion
Now that you’ve got these 30 essential dessert recipes under your belt, you’re practically a baking wizard! Your friends and family will be begging for your treats, and you’ll be the star of every gathering. Imagine whipping up a chocolate lava cake that erupts with gooey goodness or a cheesecake so divine it makes angels sing! So roll up those sleeves, grab your mixing bowls, and prepare to dazzle the world with your sweet creations!