If you’re craving a warm, nutty walnut loaf, start by preparing a greased 9×5 inch loaf pan and preheating your oven to 350°F. Next, toast and crush walnuts for added flavor. Cream softened butter and sugar until fluffy, then mix in eggs and the dry ingredients. Fold in those toasted walnuts, pour the batter into the pan, and bake until golden. Let it cool before slicing. Keep going to discover more about serving suggestions and unique pairings!
How to Make Walnut Loaf Cake
Making a delicious walnut loaf cake is easier than you might think.
Start your walnut bread recipe by creaming together 2 sticks of softened butter and caster sugar until it’s light and fluffy. Incorporate eggs one at a time to achieve that perfect texture.
In a separate bowl, mix your dry ingredients, including the flour mixture and baking powder. Gradually add this to your creamed mixture, mixing until just combined—don’t over-stir!
Next, fold in coarsely crushed walnuts, and for an extra kick, consider toasting them beforehand. To further enhance your baking experience, consider pairing your loaf with protein-packed cookies for a nutritious snack option.
Once everything’s mixed, transfer the batter into a greased loaf pan, and bake at 325°F (160°C) for about 60 minutes.
Enjoy the delightful aroma that fills your kitchen!
Preparing the Loaf Pan
When you’re ready to bake your walnut loaf, start by choosing a standard 9×5 inch loaf pan for the best results.
Make sure to grease it well with butter or cooking spray and line the bottom with parchment paper for easy removal.
Filling the pan no more than two-thirds full will help prevent any overflow while baking. Additionally, preheating the oven to the appropriate temperature is crucial for optimal baking results.
Greasing and Lining Techniques
To guarantee your walnut loaf comes out perfectly, greasing and lining the loaf pan properly is essential. Start by greasing the pan with butter or cooking spray to prevent the parchment paper from slipping.
Cut the parchment paper to fit the bottom and sides of the loaf pan, leaving some overhang for easy removal later. Make certain the corners are well covered to avoid sticking and promote even baking.
For added security, lightly flour the greased and lined pan, creating a non-stick barrier against the batter. This simple technique assures your walnut loaf releases beautifully, making your baking experience hassle-free and delicious.
Enjoy the satisfaction of a perfectly baked loaf every time!
Choosing the Right Pan
Choosing the right pan is essential for achieving the perfect walnut loaf. A standard 9×5 inch loaf pan is ideal, allowing for even baking and a proper rise.
If you opt for different pan sizes, like mini loaf pans, remember to adjust the baking time, as they typically bake in about 30-40 minutes.
Always grease and line your loaf pan with parchment paper to guarantee easy removal and prevent sticking. When filling the pan, keep it no more than 2/3 full to avoid overflow and guarantee even cooking.
If you notice the top browning too quickly, loosely cover it with foil to protect it while the rest of the loaf finishes baking.
Enjoy your warm, nutty creation!
Preheating the Oven

Preheating your oven is an essential step in baking the perfect walnut loaf. Set your oven to 350 degrees Fahrenheit and allow it to fully preheat for about 10-15 minutes. This guarantees even baking temperatures, critical for achieving that soft, fluffy texture.
You might want to use an oven thermometer to confirm accuracy since many home ovens can be off by as much as 25 degrees. Proper preheating also activates the baking soda in your recipe, helping your loaf rise beautifully. Additionally, blind baking the bottom crust ensures that your loaf maintains its desired texture without becoming soggy.
Using an oven thermometer ensures accuracy, as home ovens can vary by 25 degrees, crucial for a perfect rise.
If you skip this step, you risk uneven cooking or ending up with a dense loaf. So, don’t rush; wait until your oven reaches the right temperature before putting your batter inside.
Happy baking!
Preparing the Walnuts
To get the most out of your walnuts, you should start by toasting them in the oven until they’re fragrant and golden. This simple step enhances their flavor and adds depth to your loaf. Additionally, consider crushing them to a coarse consistency to release their oils and improve the texture of your baked goods. Toasting nuts can bring out the natural oils that enrich the overall taste of your recipes.
Toasting for Enhanced Flavor
While toasting walnuts might seem like an extra step, it greatly enhances their flavor by releasing natural oils and creating a richer, nuttier taste.
To toast walnuts, spread them evenly on a sheet pan and bake in a preheated oven at 350°F (175°C) for 8-10 minutes. Remember to stir occasionally and keep a close eye on them, as they can burn quickly if left unattended.
Once toasted, let the walnuts cool completely before chopping or adding them to your recipes. Using toasted walnuts not only boosts flavor but also adds a delightful crunch to your walnut loaves and breads.
Crushing Techniques Explained
Crushing walnuts is essential for achieving the right texture in your walnut loaf recipes. You can use a food processor on a low setting for a coarser texture, making sure not to over-process them into a paste.
If you prefer, grab a pestle and mortar for more control over the size and texture of your crushed walnuts. Before crushing, toasting walnuts enhances their flavor; simply spread them on a sheet pan and bake at 350°F (175°C) until they’re fragrant and golden.
Remember to let them cool completely before incorporating them into your batter. When measuring crushed walnuts, pack them lightly in the measuring cup to maintain the recipe’s balance.
Enjoy your delicious walnut loaf!
Creaming Butter and Sugar

Creaming butter and sugar is vital for achieving that light, airy texture in your walnut loaf. Start with softened butter at room temperature; it mixes better with granulated sugar than cold butter.
Beat the two together for about 3-5 minutes with an electric mixer until the mixture turns pale and fluffy. This process incorporates air, which is essential for creating the desired crumb structure in your quick bread.
Granulated sugar works well here, as its larger crystals help aerate the butter, but you can opt for caster sugar for a smoother texture. Mastery of mixing techniques guarantees your walnut loaf rises beautifully, providing an even bake and a delightful, tender crumb you’ll love. Happy baking!
Incorporating Dry Ingredients
After you’ve successfully creamed the butter and sugar, it’s time to incorporate the dry ingredients into your walnut loaf batter.
Start by sifting together flour, baking powder, and any spices in a separate bowl. This guarantees even distribution and prevents clumping in your mixture.
Gradually add the dry ingredients to the wet mixture, mixing until just combined to avoid over-mixing, which can lead to a dense loaf.
Remember, if you’re adjusting the walnut content, you might need to increase the baking powder for proper leavening.
Incorporating the dry ingredients in batches will give you better control over the batter’s consistency, allowing you to achieve the perfect texture in your final loaf. Additionally, consider using healthier ingredient swaps to enhance the nutritional profile of your walnut loaf.
Adding Final Ingredients
As you prepare to add the final ingredients to your walnut loaf batter, it’s crucial to handle them with care to maintain the desired texture.
Start by gently folding in a cup of chopped, toasted walnuts to enhance flavor. Incorporate your wet ingredients, like vanilla essence and yogurt, slowly to keep the mixture light and avoid any lumps. If you’re unsure about the yogurt, feel free to omit it to prevent texture issues.
When adding eggs, do so one at a time, mixing well after each addition for a smooth batter. This careful approach guarantees your loaf turns out deliciously moist and flavorful. Additionally, consider incorporating a splash of almond extract to elevate the flavor profile further.
Once mixed, you’re ready to fill the loaf pan and move on to baking!
Baking and Cooling
Baking your walnut loaf is a crucial step that can make or break your creation. To guarantee success, follow these key points:
- Preheat your oven to the perfect temperature—between 325°F and 350°F—for even baking.
- Use a standard 9×5 inch loaf pan, lined with parchment paper, for easy removal after baking.
- Monitor the baking time closely, typically 50 to 60 minutes. Start checking doneness by inserting a skewer into the center; it should come out clean.
- If the top browns too quickly, cover it loosely with foil to prevent burning while the center bakes.
After baking, let your loaf cool in the pan for about 10 minutes before transferring it to a cooling rack for full flavor and texture development. Additionally, consider enhancing your loaf by incorporating rich flavor similar to classic desserts like the Hungarian Dobos Torte.
Serving Suggestions
When it comes to serving your walnut loaf, there are several delightful options that can elevate your experience.
For a comforting dessert, serve slices with a dollop of whipped cream or a scoop of vanilla ice cream. If you’re in the mood for a midday snack, pair the loaf with afternoon tea or coffee to complement its rich flavors.
You might also toast slices before serving for added warmth and a satisfying crunch. Additionally, consider enjoying walnut loaf as a side with soups or salads, as its nutty flavor enhances the meal.
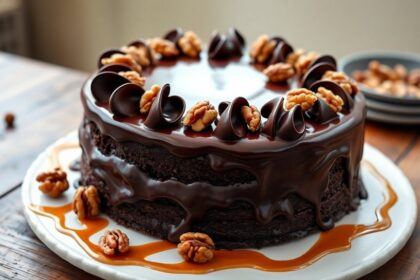
For an elegant touch, drizzle a sugar glaze over the cooled loaf and sprinkle chopped toasted walnuts on top for visual appeal and extra taste. To elevate your dessert experience, consider pairing it with decadent chocolate-dipped madeleines for a luxurious treat that complements the loaf’s nutty richness.
Conclusion
In the end, you’ve created a warm and nutty walnut loaf that’s perfect for any occasion. You’ve followed each step, you’ve savored the aroma, and you’ve delighted in the taste. Whether you share it with friends, enjoy it with tea, or savor it alone, this loaf brings comfort and joy. So, take a moment to appreciate your creation, relish each slice, and embrace the warmth that comes from baking something delicious. Happy baking!