You can delight your furry friend this holiday season with homemade dog Christmas cookies that are both tasty and healthy. Start with natural peanut butter, whole wheat flour, and mashed bananas for a delicious base. Mix the ingredients, roll out the dough, and cut festive shapes before baking. Don't forget to create a yogurt frosting for extra flair! Make certain the cookies are free from toxic ingredients like xylitol and chocolate. Store them in an airtight container for maximum freshness. Want more tips on variations and festive decoration ideas? There's plenty more to uncover!
Ingredients for Dog Cookies
When you're making homemade dog cookies, you'll want to gather a few key ingredients that are both safe and nutritious for your furry friend.
A great dog treats recipe starts with natural peanut butter, as it's not only tasty for dogs but also packed with healthy fats and protein. Just make certain the peanut butter you choose is free of xylitol, a sweetener that's toxic to dogs.
Another important ingredient is whole wheat flour, which provides a good base for your cookies. If your pup has allergies, consider alternatives like brown rice flour or pumpkin puree instead.
You can also add mashed bananas for a natural sweetener and extra flavor. For a festive touch, you might like to include beet powder, but always confirm any vegetable powders are safe for dogs.
Baking Instructions
To start baking your homemade dog cookies, you'll want to prep the dough first.
Consider using gluten-free flour alternatives for a healthier option, as they provide a cleaner and more natural ingredient list for your pup.
Combine all ingredients in a mixing bowl, then roll it out to the perfect thickness.
Once you cut out your festive shapes, it's time to bake and cool them for your pup's enjoyment!
health benefits of gluten-free options
Prepping the Dough
Prepping the dough for your homemade dog Christmas cookies is a straightforward process that sets the stage for delicious treats.
Start by preheating your oven to 350°F and lining your baking sheets with parchment paper to prevent sticking during baking. In a mixing bowl, combine the ingredients for your dog cookies on low speed until you achieve a uniform dough consistency.
Once everything is well mixed, it's time to roll out the dough. Place it between two sheets of parchment paper and roll it to a 1/4-inch thickness. This method helps maintain an even thickness for uniform baking and makes it easier to handle.
After you've rolled out the dough, use cookie cutters to cut it into festive shapes that'll make your treats visually appealing for both pets and their owners.
Confirm the dough is firm enough to roll without sticking, and then transfer the cut shapes onto your prepared baking sheet with parchment. This simple process guarantees that your homemade dog cookies will be a hit during the holiday season!
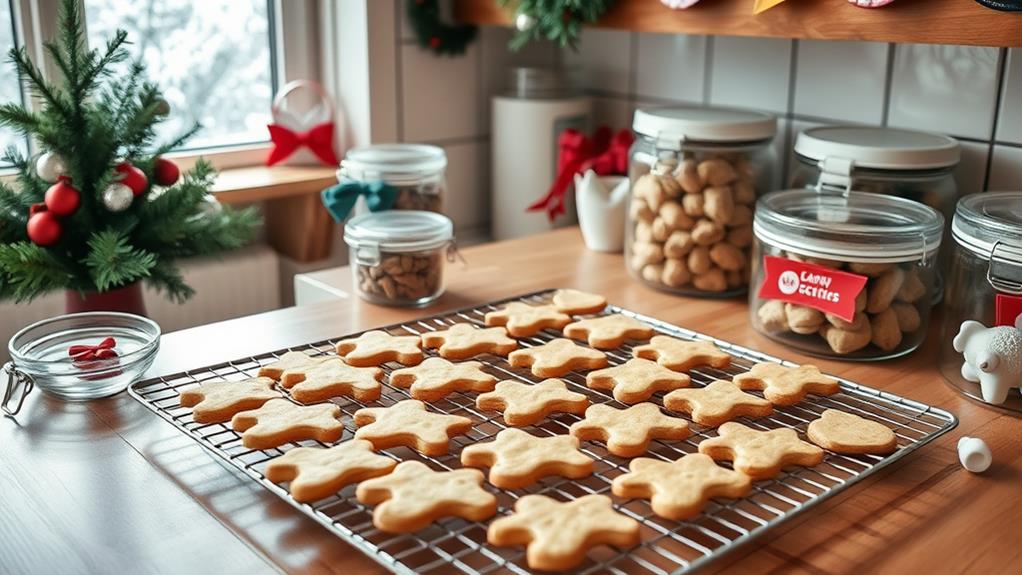
Baking and Cooling
Baking your homemade dog Christmas cookies is the final step that transforms your prepared dough into delightful treats.
Start by preheating your oven to 350°F and lining your baking sheets with parchment paper. This will help prevent sticking while baking the cookies.
Once your dough is ready, roll it out to a 1/4-inch thickness using a rolling pin. It's time to get creative! Use cookie cutters to cut the dough into festive shapes that'll make your pup's tail wag.
Place the cutouts on the prepared baking sheets, making sure they've enough space between them. Bake the cookies for about 17 minutes or until they turn golden brown. To guarantee even baking, consider rotating the sheets halfway through.
After baking, remove the cookies from the oven and let them cool completely on a wire rack. This step is essential for maintaining their texture and flavor.
Once cooled, store these delicious treats in an airtight container to keep them fresh and prevent spoilage. Your furry friend will surely appreciate the effort you put into making these holiday delights!
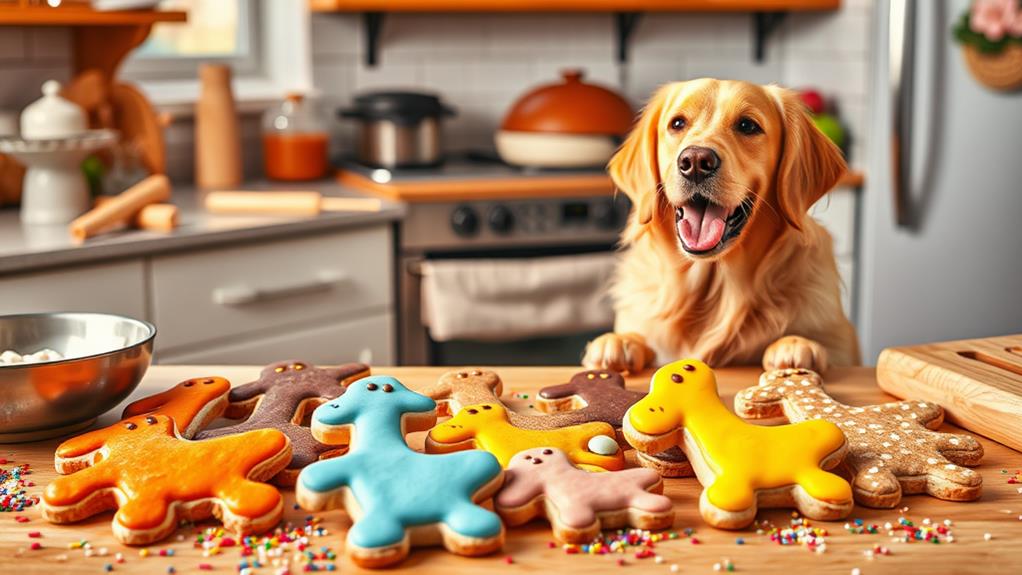
Cookie Presentation
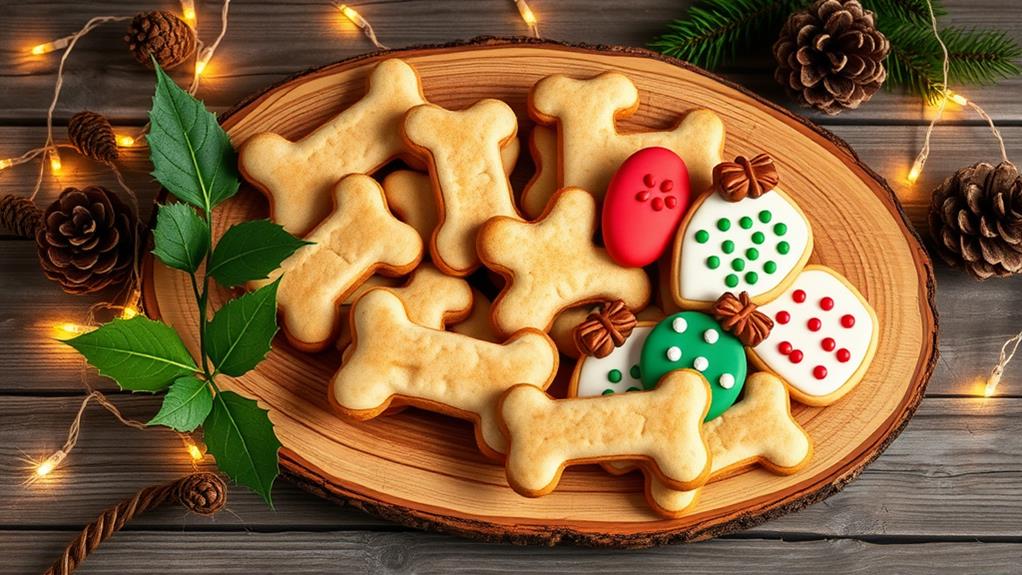
When it comes to cookie presentation, you'll want to make your homemade dog treats look as festive as possible.
Consider using vibrant icing and playful patterns to elevate their appearance, making them even more appealing for the holidays, similar to festive sugar cookie recipes and techniques.
Use clear boxes or cupcake containers to showcase their colorful shapes, like Christmas trees or bones.
This not only enhances their visual appeal but also makes them perfect for gifting to fellow dog lovers.
Visual Appeal Techniques
Creating visually appealing presentations for your homemade dog Christmas cookies can elevate the gifting experience for both pets and their owners.
A well-crafted presentation not only showcases your cookies but also adds excitement to the holiday season. Here are some techniques to contemplate:
- Use Festive Packaging: Opt for clear boxes or cupcake boxes that highlight the festive shapes and colors of your dog cookies. This makes them irresistible!
- Incorporate Variety: Make different cookie shapes that reflect various dog breeds or holiday themes. Unique shapes will grab attention and spark joy.
- Enhance with Color: Add colorful beet powder to your cookie dough to achieve vibrant hues.
Don't forget to decorate with dog-friendly frosting made from cream cheese and honey for extra flair.
Gift Packaging Ideas
To make your homemade dog Christmas cookies truly stand out, thoughtful gift packaging plays a significant role. Using clear boxes is a fantastic idea, as they showcase your delicious treats beautifully while keeping them fresh.
When you use festive cookie cutters to create a variety of shapes, it adds an element of fun that appeals to both pet owners and their furry friends.
To enhance the festive spirit, consider decorating the cookie boxes with holiday-themed ribbons or stickers. This small touch can transform your gift into something special and eye-catching.
Make sure the treats are securely packaged to prevent any breakage during transport; you want them to look as good as they taste!
Don't forget to include a personalized note or tag with the recipient's pet's name. This thoughtful gesture makes your gift feel even more special.
Health Considerations
Guaranteeing your homemade dog Christmas cookies are safe starts with choosing the right ingredients. You'll want to avoid anything toxic to dogs, like xylitol, chocolate, grapes, and onions. These substances can seriously harm your furry friend, so be mindful of what you include.
Additionally, incorporating nutritious options can enhance your dog's overall well-being, making your treats not just delicious but also beneficial. For instance, using ingredients like gluten-free alternatives can assure that your furry friend enjoys a safe and healthy treat.
It's also vital to monitor for food sensitivities or allergies. Some common triggers include beef, dairy, and chicken, which can lead to scratching or gastrointestinal issues.
To help you stay on track, here are three key health considerations:
- Choose Natural Ingredients: Use wholesome, natural ingredients like peanut butter and honey, avoiding harmful additives.
- Consult Your Veterinarian: Before introducing new ingredients, check with your vet to guarantee they align with your dog's dietary needs and restrictions.
- Practice Moderation: Treats should be given in moderation to prevent obesity and maintain a balanced diet. Excessive treats can disrupt your dog's nutritional intake.
Variations and Alternatives

When making homemade dog Christmas cookies, consider the fun of customizing your recipes to suit your pup's preferences and dietary needs. If your dog has allergies, you can substitute peanut butter with plain pumpkin puree or mashed sweet potato, using the same amount in your recipe for dog biscuits.
For those colorful treats, think about adding beet powder for a festive touch, or use fresh cooked and pureed beets as a natural color enhancer. Just keep in mind that this may slightly alter the dough's texture. Additionally, you might explore sugar-free options to guarantee the treats aren't only tasty but also healthy for your furry friend.
You can also experiment with various vegetable powders like spinach or carrot powder to introduce different colors and flavors in your dog cookies. If you want to avoid artificial sweetener, stick to natural ingredients that are safe for your furry friend.
Additionally, if you're looking to elevate your treat recipes, consider using yogurt or tapioca starch to create a simple frosting that can add a delightful finishing touch. By playing around with these variations, you can create unique and delicious dog biscuits that your pup will love this holiday season!
Frosting and Decoration
Frosting adds a delightful touch to homemade dog Christmas cookies, making them not only tasty but visually appealing as well. You can easily whip up a dog-friendly frosting using low-fat cream cheese, honey, and vanilla.
To create a festive look, split the frosting into separate bowls and mix in some dog-safe food coloring. Consider enhancing the nutritional value of your cookies by incorporating superfoods like pumpkin puree or peanut butter, which can provide added health benefits for your furry friend healthier ingredient swaps.
Here are three easy ideas for decorating your cookies:
- Outline and Flood: Use thicker frosting to outline the cookie shapes, then flood the centers with thinner frosting for vibrant designs.
- Piping Bags: Fill piping bags or plastic bags (with the corner snipped off) to create various designs. You can add swirls, dots, or even write your dog's name on the cookies.
- Festive Sprinkles: If you want to add an extra touch, consider using dog-safe sprinkles or crushed treats to sprinkle on top of the frosted cookies.
Allow the frosting to set before storing your homemade dog Christmas cookies. This will help prevent smudging and keep them looking great for your furry friend's holiday celebration!
Storage and Freezing Guidelines
Proper storage is essential for keeping your homemade dog Christmas cookies fresh and tasty. First, make certain to allow the cookies to cool completely before you store them. This prevents moisture buildup, which can lead to soggy treats.
Once they're cool, place your homemade dog cookies in an airtight container. If you store them in the refrigerator, they'll stay fresh for up to a month.
For longer storage, you can freeze your cookies. To do this, first, place them in the freezer for about an hour. This step prevents the cookies from sticking together.
After that, transfer them to freezer-safe bags or containers. In the freezer, your homemade dog cookies can last for up to eight months.
When you're ready to treat your furry friend, simply thaw the frozen cookies in the refrigerator. This guarantees they reach a safe temperature before serving.
Recipe Details and Tips
You'll find that this Christmas dog cookie recipe is both simple and rewarding, yielding about 42 delightful treats. With a total preparation and cooking time of around 47 minutes, you can whip these up quickly for your furry friends.
The key ingredients include whole wheat flour and natural peanut butter. Just make certain the peanut butter is free from xylitol, as it's toxic to dogs.
Here are some tips to enhance your cookie-making experience:
- Use festive cookie cutters: Shape your treats into fun holiday figures to spread cheer.
- Allow cookies to cool: Let them cool completely before frosting to guarantee your icing sets properly and doesn't melt.
- Storage options: Keep the cookies in an airtight container in the refrigerator for up to one month or freeze them for up to eight months for peak freshness.
These cookies make a perfect treat for your dogs during the holiday season. Enjoy making them, and watch your pets savor every bite!
Flavor Variations and Adjustments
When it comes to making dog Christmas cookies, don't be afraid to mix things up with flavor variations and adjustments. You can easily create a tasty treat that your furry friend will love.
For instance, if your dog enjoys nut butters, consider using almond or cashew butter instead of peanut butter, as long as they're safe for your dog. Plain pumpkin puree or mashed sweet potato can also replace other ingredients in equal amounts, adding moisture and flavor for sensitive pups.
To get the right consistency for your dough, gradually introduce new ingredients to keep it firm yet slightly sticky. If you're aiming for colorful cookies, try incorporating vegetable powders, like sweet potato or spinach, which add unique flavors and are safe for dogs to eat.
A splash of low-sodium chicken or beef broth can enhance the overall flavor profile, making your cookies even more appealing to picky eaters.
Lastly, if you're using rice flour, remember that it can work as a gluten-free option, ensuring that your furry buddy enjoys every bite. With these adjustments, your homemade dog cookies will be a hit this Christmas!
Conclusion
Making homemade dog Christmas cookies is a fun way to treat your furry friend during the holiday season. Did you know that 78% of dog owners prefer to give homemade treats over store-bought ones? By baking these special cookies, you not only bond with your pet but also guarantee they're getting wholesome ingredients. So, roll up your sleeves, get creative with flavors, and make this holiday memorable for your pup with tasty, tail-wagging goodies!