Create a princess cake by stacking sponge layers with raspberry jam, custard, whipped cream. Chill for flavors to meld. Cover in marzipan and shape it regally. Top with a marzipan rose for elegance. Add frosting swirls and luster dust. Finish with powdered sugar and marzipan rose. Serving chilled sets flavors perfectly. Make yours stand out with a crown cake topper. Add a touch of luxury with silver or gold luster dust. Master piping swirls for an elegant look. These steps will help you bake a princess cake fit for royalty.
Ingredients for Princess Cake
To make a delicious Princess Cake, gather sponge cake layers, raspberry jam, vanilla custard, whipped cream, and marzipan for decoration.
The cake is built upon the foundation of light and airy sponge cake layers, generously spread with sweet raspberry jam and smooth vanilla custard. Each layer is moistened with a simple syrup made from sugar and water before assembly to guarantee a delectable texture.
Whipped cream is then generously spread between the layers, adding a creamy richness to the cake.
The final touch involves covering the entire confection with marzipan, which is often dyed a vibrant green color. This marzipan not only lends a smooth finish to the cake but also provides a perfect canvas for additional decorations like intricate marzipan roses, delicate fondant accents, and shimmering edible pearls, transforming the Princess Cake into a true work of art.
Preparing the Vanilla Cake Batter
For the vanilla cake batter preparation, combine oil, margarine, sugar, flour, baking powder, salt, milk, vanilla essence, and eggs in a bowl. Confirm all ingredients are well mixed together following a specific mixing process to achieve a smooth batter consistency.
Preheat your oven to the recommended temperature for baking the cake. Properly grease and flour your baking pans to prevent sticking before pouring in the vanilla cake batter.
Once the batter is prepared and the pans are ready, bake the cakes according to the specified time and temperature guidelines for the best results. Following these steps will help you create a delicious and fluffy vanilla cake that will be perfect for your princess cake creation.
Remember to keep an eye on the baking process and use a toothpick to check for doneness before removing the cakes from the oven.
Baking and Cooling the Cakes
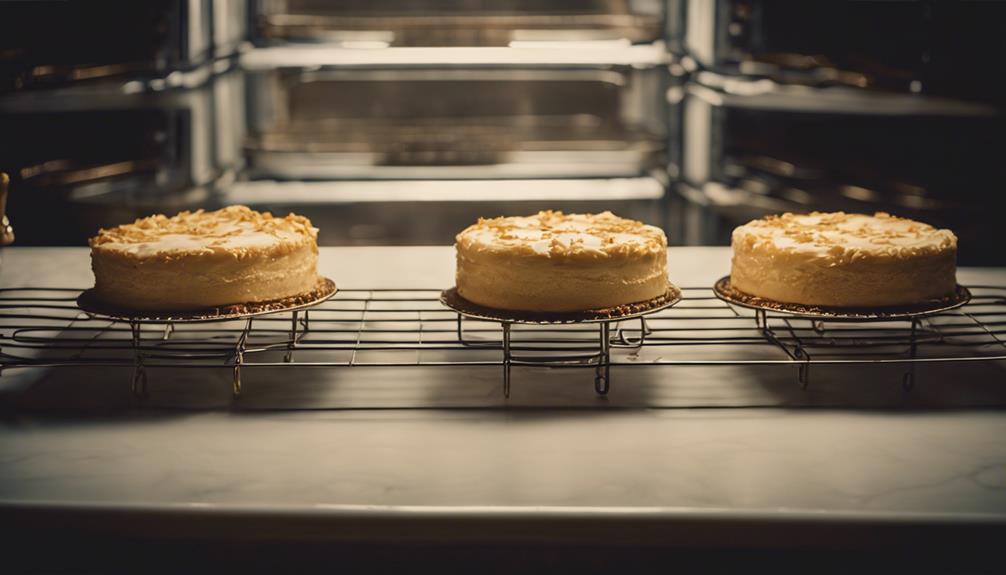
Now that the cakes are baked, it's vital to let them cool completely before you handle them. This step guarantees the cakes maintain their shape and don't collapse during assembly.
Once cooled, you can proceed to level and shape the cakes for a sturdy and visually appealing princess cake presentation.
Preparing the Batter
Begin by preparing the batter according to the vanilla cake recipe. Guarantee all ingredients, including oil, margarine, sugar, flour, baking powder, salt, milk, vanilla essence, and eggs, are well mixed. Divide the batter between round and bowl-shaped cake pans as directed in the recipe. Remember to preheat the oven to the specified temperature before baking.
Once the cakes are in the oven, monitor them closely and perform the toothpick test to check for doneness. Insert a toothpick into the center of the cakes; if it comes out clean, the cakes are ready. After baking, allow the cakes to cool completely before handling them for assembly.
For the round cakes, use a large serrated knife to level them. As for the bowl-shaped cake, trim and shape it to resemble a skirt for the princess cake design.
Once the cakes are cooled and shaped, you can proceed with cutting them into layers, brushing with simple syrup, and stacking with buttercream to create a moist and flavorful base for your princess cake.
Baking the Cakes
To bake the cakes for your Princess Cake, make sure the oven has been preheated to the specified temperature. Use round and bowl-shaped pans to create the necessary cake shapes.
After baking, allow the cakes to cool completely before attempting to assemble the Princess Cake. To achieve the desired layers, cut the cakes into appropriate sizes using a cookie cutter for precise shaping.
Remember to brush each cake layer with simple syrup to keep them moist and flavorful.
Following these steps will guarantee that your Princess Cake turns out beautifully. The round pans will help you achieve the perfect cake shapes, and cutting the cakes into layers will allow for a visually appealing final product.
Cooling the cakes completely is essential for successful assembly, and brushing them with simple syrup adds a delicious touch.
Cooling for Assembly
Once the cakes have finished baking, make sure they cool completely on wire racks before moving on to the assembly process to maintain their shape and stability.
Cooling the cakes is vital to prevent crumbling and guarantee they retain their form during the assembly of the Princess Cake. If you're in a hurry, a quick stint in the refrigerator can expedite the cooling process without compromising the cakes.
Working with cakes at room temperature makes it easier to layer and shape them for the Princess Cake. By making sure your cakes are properly cooled, you're laying a stable foundation for the next steps of adding fillings and decorations in the assembly process.
Trimming, Layering, and Moistening
You can achieve a flat surface suitable for stacking by trimming the dome-shaped top off the cake layers.
To create a delicious Princess Cake, follow these steps:
- Layer the sponge cake with decadent fillings like raspberry jam, vanilla custard, and whipped cream.
- Moistening the cake layers with a simple syrup is key to keeping the cake moist and adding flavor.
- Brush each cake layer with the syrup before adding the fillings for a delectable and moist outcome.
Proper trimming, layering, and moistening are essential for a successful and flavorful Princess Cake.
Assembling the Princess Cake
For a classic Princess Cake, begin assembling by stacking the cooled cake layers with raspberry jam, custard, and whipped cream in between. Start by placing one layer of cake on a serving plate and spreading a generous amount of raspberry jam followed by a layer of custard. Top it with another cake layer and repeat the process until all layers are stacked.
Finish by covering the entire cake with whipped cream, ensuring it's smooth and evenly distributed. Chill the assembled cake for at least 30 minutes to allow the flavors to meld and the cake to set.
Once chilled, cover the cake with a layer of marzipan for that traditional Scandinavian touch. Roll out the marzipan into a large circle and carefully drape it over the cake, smoothing it down the sides gently. You can then decorate the cake with a marzipan rose on top as a beautiful edible garnish.
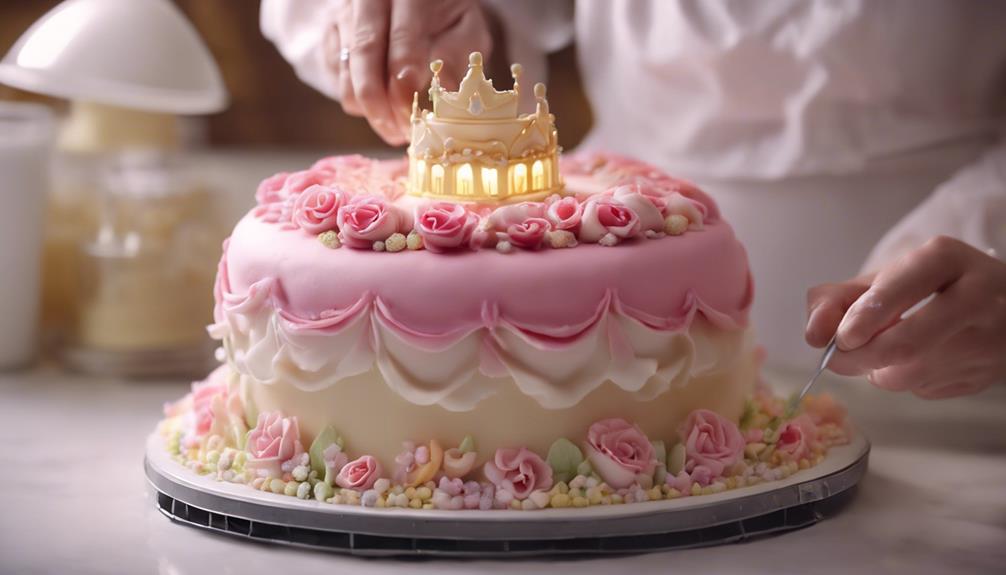
Decorating the Princess Cake
To decorate your princess cake, consider adding a crown cake topper for a regal touch.
Use pink frosting swirls to create a whimsical and elegant design on the cake.
These decorative elements will enhance the princess theme and make your cake fit for royalty.
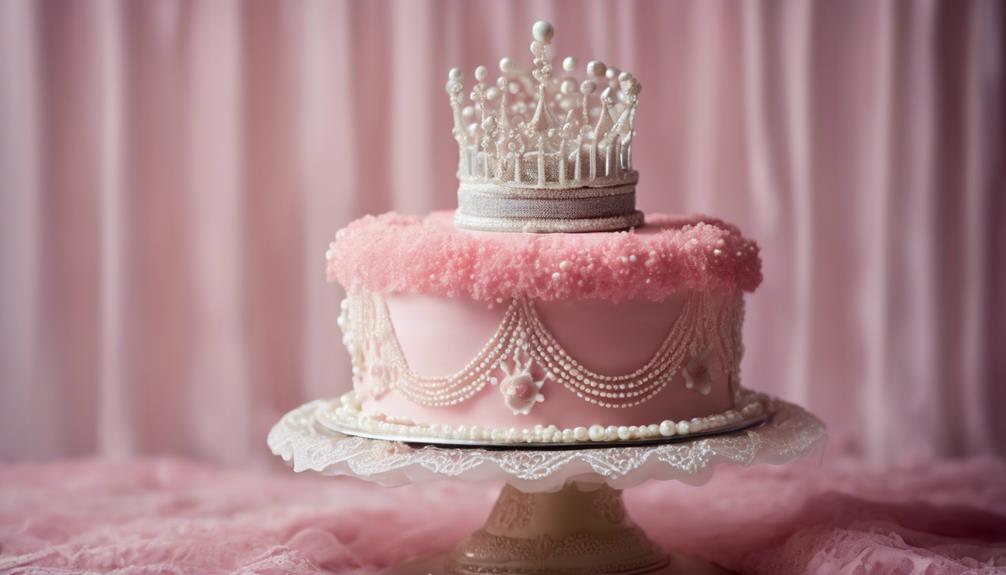
Crown Cake Topper
Want to add a regal touch to your princess cake? Consider crafting a crown cake topper for that royal finishing touch.
- Royal Touch: A crown cake topper elevates the elegance of your princess cake.
- Materials: Choose from fondant, gum paste, or molded chocolate to create your crown.
- Design: Create intricate crown designs using silicone molds or hand shaping techniques.
- Enhancements: Add a touch of luxury with edible gold or silver luster dust for a shimmering effect.
- Decoration: Place the crown on top of the cake as a stunning and regal decorative centerpiece.
Adding a crown cake topper to your princess cake not only enhances its appearance but also adds a touch of sophistication fit for royalty. Whether you opt for a simple design or a more intricate one, the crown will surely be the highlight of your cake, making it a true masterpiece for any royal celebration.
Pink Frosting Swirls
Craft delicate pink frosting swirls on your Princess Cake using a piping bag with a star tip for a charming and elegant decoration. Begin piping from the bottom of the cake, smoothly working your way up in a spiral motion.
By adjusting the pressure on the piping bag, you can control the thickness of the swirls, ensuring a uniform and polished design. Experiment with various piping techniques and patterns to introduce visual interest and texture to the cake, making it visually appealing.
The addition of pink frosting swirls not only enhances the overall presentation of the Princess Cake but also brings a touch of elegance and charm to your creation. These swirls create a visually stunning look that elevates the cake's aesthetic, making it suitable for any special occasion or celebration.
Mastering the art of piping swirls will certainly add a beautiful finishing touch to your Princess Cake, impressing your guests with its intricate design.
Final Touches and Presentation
Consider dusting your finished Princess Cake with powdered sugar to achieve a classic and elegant presentation.
Adding a marzipan rose on top of the cake as a traditional and decorative garnish can enhance its overall look.
Remember to chill the completed cake for at least 30 minutes before serving to set the layers and flavors perfectly.
For an authentic Scandinavian Princess Cake appearance, cover the entire cake with marzipan.
The final touches and presentation are important as they greatly impact the visual appeal and charm of the Princess Cake.
- Dust with powdered sugar: For a classic finish.
- Add a marzipan rose: A traditional and decorative garnish.
- Chill before serving: Enhances flavors and sets the layers.
- Cover with marzipan: Achieve an authentic Scandinavian look.
- Importance of presentation: Influences the visual appeal and charm of the cake.
Conclusion
Now that you've completed baking your princess cake, you may be worried about the intricate decorating process. However, with a steady hand and a little patience, you'll be able to create a beautiful masterpiece fit for royalty.
Remember, practice makes perfect, so don't be discouraged if your first attempt isn't flawless. Keep honing your skills and soon you'll be baking princess cakes like a pro.
Enjoy the process and have fun creating something special!