
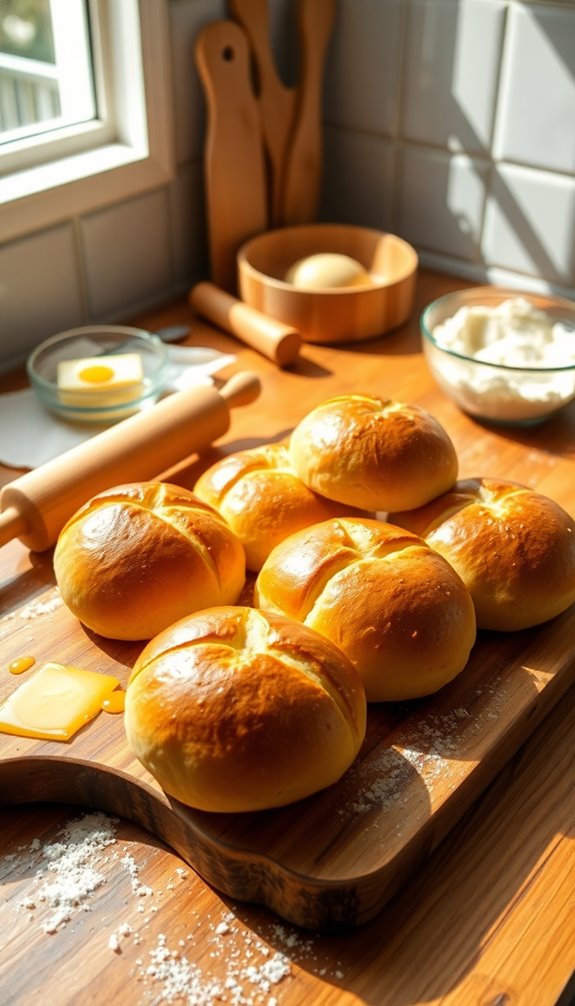
Morning rolls are soft, freshly baked breakfast treats that are easy to make at home. To whip up these warm, bakery-style rolls, you'll need strong white flour, fast-action yeast, sugar, lard, and a pinch of salt. Mix the ingredients, knead the dough, and let it rise until doubled in size. Shape, bake until golden, and enjoy them warm. With endless possibilities for savory fillings, there's so much more to discover about perfecting your morning rolls.
What Are Morning Rolls?
When you think of a perfect breakfast treat, morning rolls might just come to mind. These soft, freshly baked rolls are beloved for their light, crisp exterior and airy interior. Commonly referred to as rolls, cobs, or buns, they're a traditional breakfast staple, especially in Scotland. Morning rolls are ideal for savory fillings like bacon or sausage, making them versatile for any breakfast gathering. The dough typically includes strong white flour and lard, contributing to their delightful texture and flavor. Best enjoyed fresh on the day they're baked, morning rolls can also be stored in an airtight container overnight and reheated. Additionally, using gluten-free flour can accommodate those with dietary restrictions, ensuring everyone can enjoy these delicious rolls. Gluten-free options allow for creating a variety of tasty treats, similar to the indulgent peanut butter cookies enjoyed by many. Many enjoy pairing morning rolls with a slice of traditional Julekage, elevating the breakfast experience. With a recipe yielding 9 to 12 rolls, you'll have plenty to share with family and friends.
Essential Ingredients for Morning Rolls
When making morning rolls, you'll want to focus on a few key ingredients that really make a difference.
Strong white flour gives your rolls that perfect chewy texture, while fast-action yeast and sugar work together to boost flavor and help the dough rise. Using the right type of flour can greatly influence the texture and taste of your rolls, enhancing their overall quality. Incorporating nutrient-rich flours into your recipe can elevate both the flavor and nutritional profile of your morning rolls. Almond flour is a great option that not only provides a gluten-free alternative but also adds a nutty richness to the rolls.
Key Ingredients Overview
Creating the perfect breakfast rolls hinges on a few key ingredients that work together to deliver flavor and texture. Strong White Flour provides the necessary structure and chewiness, while lard or vegetable shortening enhances flavor and keeps your rolls fresh.
Fast-action Yeast is essential for a quick rise, making your baking process more efficient. You'll want to add salt, as it not only boosts flavor but also helps regulate the yeast activity.
For sweetness and moisture retention, granulated sugar plays an important role, feeding the yeast as it works. If you prefer, butter can substitute for lard or shortening, adding a rich taste.
Accurate measurement of these ingredients is critical for achieving the best results in your morning rolls.
Flour Types Comparison
Choosing the right flour is key to crafting the perfect breakfast rolls. Strong Bread Flour is your best bet, thanks to its high protein content that gives your rolls a good structure and delightful chewiness.
If you opt for Plain Flour, expect a softer texture, which may not provide that ideal crust. Wholemeal Flour adds a nutty flavor and fiber but can result in denser rolls; it's often best mixed with white flour for balance.
Bread Flour is similar to Strong Bread Flour but has a slightly higher protein level, enhancing chewiness and rise.
Avoid cakey flour, as its low protein content leads to a crumbly texture, making it unsuitable for rolls.
Yeast and Sugar Roles
While crafting perfect breakfast rolls, understanding the roles of yeast and sugar is essential.
Yeast ferments the sugars in your dough, producing carbon dioxide that makes your rolls rise and develop that light, fluffy texture you crave.
Sugar isn't just for sweetness; it feeds the yeast, enhancing fermentation, improving flavor, and retaining moisture to keep your rolls soft.
Fast-action yeast is a popular choice because it simplifies the process, allowing for quicker rise times.
However, balance is key; too much sugar can hinder yeast activity, while too little may lead to dense rolls.
Together, yeast and sugar create a symbiotic relationship, ensuring your morning rolls aren't only well-leavened but also deliciously flavorful.
Happy baking!
Step-by-Step Preparation Instructions
To kick off your breakfast rolls, start by mixing strong white flour, fast-action yeast, salt, and sugar in a mixing bowl.
Next, rub in lard or vegetable shortening until it resembles breadcrumbs.
Combine warm milk and water, then add it to the dry ingredients to form a sticky dough.
Knead the dough on a floured surface for about 10 minutes until smooth and pliable.
- Let rise in a greased bowl for 1-2 hours until it doubles in size.
- Divide the dough into equal pieces and shape into rolls.
- Arrange the shaped rolls on a greased baking sheet, cover loosely, and let rise again for another 1-2 hours until puffy.
Baking these rolls at the right temperature is crucial for achieving a delightful texture, similar to how the aroma of baking peanut butter bread fills the kitchen with warmth. The warmth of the dough during the rising process can enhance its flavor, similar to how chocolate chip cookies gained popularity during the Great Depression.
Bake at 230°C until golden brown. Incorporating resting the dough enhances its texture, similar to how resting pancake batter can improve fluffiness.
Kneading and Rising Techniques
When you knead the dough, you're developing gluten, which is essential for a great rise. To achieve the best results, make certain you create ideal rising conditions by keeping the dough warm and allowing it to double in size. This careful attention to kneading and rising will guarantee your breakfast rolls are light, fluffy, and full of flavor. Additionally, the right balance of essential ingredients will enhance the overall texture and taste of your rolls, including the importance of proper hydration for achieving the perfect dough consistency. Using gluten-free options can also provide a delicious alternative for those with dietary restrictions.
Kneading Methods Explained
Kneading dough is a crucial step in creating delicious breakfast rolls, as it develops gluten, which gives the rolls their structure and chewiness. You can knead by hand or use a stand mixer with a dough hook attachment for convenience.
Here are some key methods to take into account:
- Hand Kneading: On a floured work surface, fold and push the dough for about 10 minutes until smooth and elastic.
- Stand Mixer: Mix at medium speed for 5-7 minutes, allowing the dough to come together easily.
- Cold Fermentation: After initial kneading, refrigerate the dough for up to 24 hours for enhanced flavor before letting it rise in a greased bowl.
This technique guarantees a light and airy interior, perfect for your breakfast rolls!
Optimal Rising Conditions
While achieving the perfect rise for your breakfast rolls may seem challenging, understanding the ideal conditions can make a significant difference.
Start by kneading your dough for about 10 minutes until it's smooth and elastic; this helps the dough to come together. Next, let it sit in a warm, draft-free environment, ideally around 75°F, covered with a damp cloth or plastic wrap. Allow the dough to rise for 1-2 hours until it's doubled in size.
After shaping, don't skip the second rise—let the rolls proof for an additional 1-2 hours until they peak over the tops of your muffin tin. Keep an eye on your dough, ensuring it's adequately expanded before placing it on the baking tray.
Shaping and Baking Your Rolls
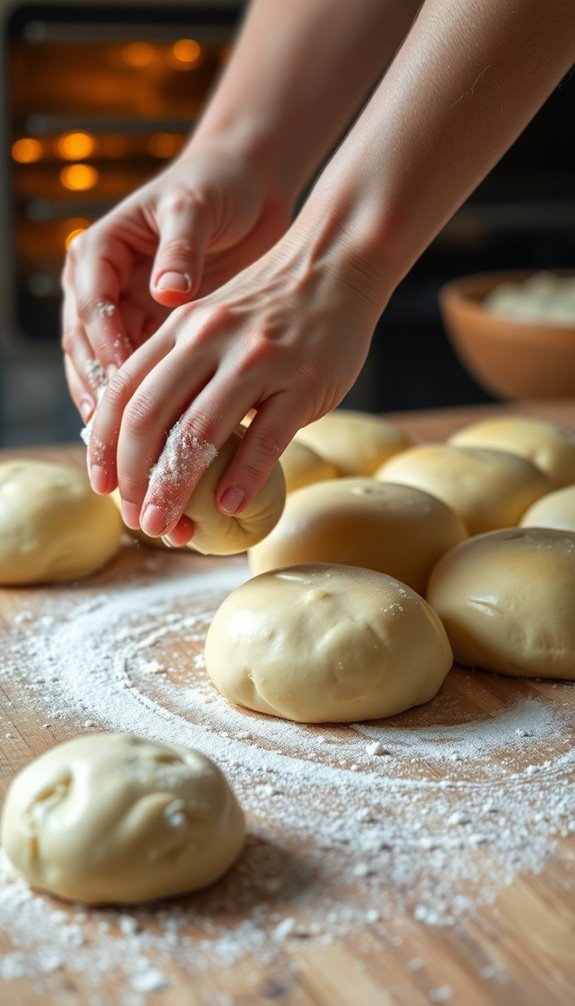
To shape your breakfast rolls perfectly, start by dividing the dough into equal portions and gently rolling each piece into a smooth ball. This guarantees a nice surface for an even rise during baking. Additionally, using high-protein ingredients in your dough can enhance the nutritional value of your rolls.
Next, place the rolls on a lined baking tray or in a muffin tin, allowing them to touch slightly to encourage a soft crust during the second proof. The technique of layering mixtures can create a delightful texture in baked goods.
- Cover the rolls with a damp cloth or plastic wrap.
- Let them proof in a warm environment for about 1-1.5 hours until they puff up.
- Preheat the oven to 230°C (or 210°C for fan-assisted) about 15 minutes before baking.
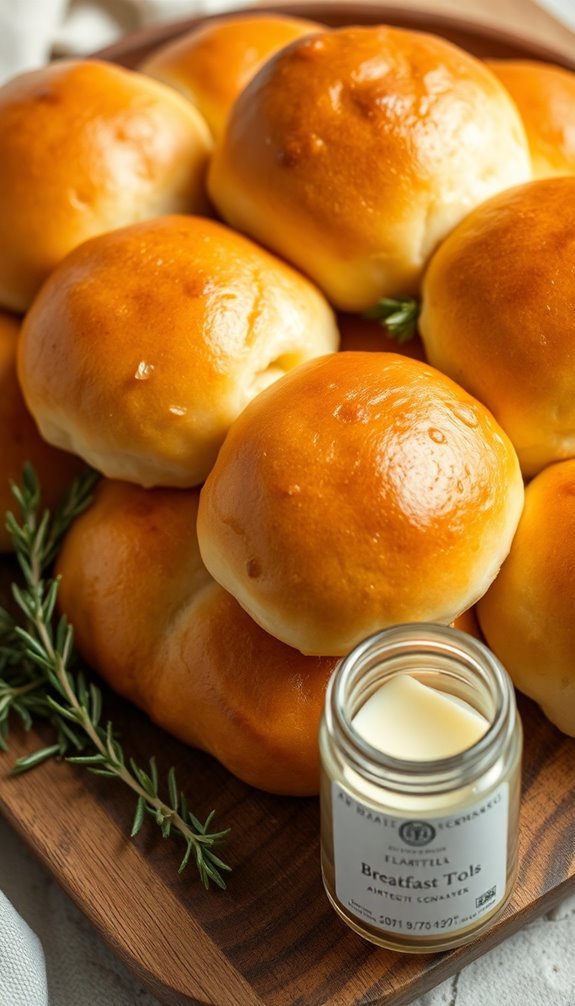
Bake the rolls for 12-15 minutes until golden brown. Incorporating alternative fats like avocado or coconut oil can enhance the flavor and health benefits of your rolls. Enjoy your delicious, warm rolls!
Cooling and Serving Suggestions
Once your breakfast rolls have finished baking, it's essential to let them cool on a wire rack. This prevents steam buildup, which can make them soggy.
For the best flavor and texture, serve your rolls warm, ideally fresh out of the oven. If you want to elevate them, dip each warm roll in melted butter and roll them in cinnamon-sugar for an irresistible sweetness. Enjoy them right away for that bakery-style experience!
If you happen to have leftovers, store them in an airtight container at room temperature to maintain their freshness for up to three days. When you're ready to enjoy them again, simply reheat the rolls in a 300°F oven for about 10 minutes to restore their warmth and softness.
Storage Tips for Freshness
After enjoying those warm, freshly baked rolls, it's important to think about how to keep them fresh for as long as possible. Here are some storage tips to maintain their softness and flavor:
- Store rolls in an airtight container at room temperature for up to three days.
- Wrap the rolls in a clean tea towel before placing them in the container to retain moisture and prevent staleness.
- For longer storage, freeze rolls on the day they're baked. Make certain they're well-wrapped to avoid freezer burn.
When you're ready to enjoy them again, thaw the frozen rolls naturally or use a microwave for quick thawing, though this may slightly alter their texture.
Enjoy the freshness!
Variations and Creative Fillings
While you might think of breakfast rolls as simple bread, they offer endless possibilities for creativity with fillings. You can transform morning rolls into something extraordinary by adding creative fillings.
For sweet variations, try chocolate chips or cinnamon sugar for a delightful treat. If you're craving a savory twist, consider cooked bacon or sausage with cheese, making your breakfast roll a hearty option.
Experiment with different cheeses like feta or goat cheese and pair them with spinach or sun-dried tomatoes for a Mediterranean flair.
Don't forget to incorporate spices like garlic powder or smoked paprika to elevate the flavor profile, ensuring your rolls aren't just airy on the inside but bursting with deliciousness.
Enjoy your culinary adventure!
Conclusion
Now that you've mastered the art of morning rolls, you can enjoy bakery-style goodness right in your kitchen. With their warm, pillowy texture and endless filling possibilities, these rolls are sure to elevate any breakfast spread. So, gather your ingredients and channel your inner artisan baker—it's time to treat yourself and your loved ones to a delightful morning feast. After all, who doesn't appreciate the simple pleasures of a well-made roll, reminiscent of a bygone era?